
Sinhroniziraj iCloud z Thunderbirdom - evo kako
Z IMAP-om lahko preprosto sinhronizirate svoj e-poštni naslov iCloud s Thunderbird-om. Pokazali vam bomo, kako.
V račun Thunderbird dodajte iCloud naslov kot račun
Za uporabnike Outlooka je Apple zagotovil priročno nadzorno ploščo iCloud, s katero lahko sinhronizirate e-pošto, stike in koledarje z Outlookom. Ta rešitev za Thunderbird ne deluje. S preprosto povezavo IMAP in iCloud lahko e-poštna sporočila iCloud vedno sinhronizirate:
- Ustvarite nov račun iCloud ali pripravite dostopne podatke za vaš obstoječi račun.
- Odprite Thunderbird, kliknite "Orodja" in izberite "Nastavitve računa".
- V pojavnem oknu spodaj levo kliknite »Dejanja računa« in »Dodaj e-poštni račun«.
- Zdaj vnesite svoje ime, svoj e-poštni naslov iCloud (npr. ) in geslo. Potrdite s klikom na "Naprej".
Sync iCloud: prilagodite nastavitve strežnika v Thunderbird-u
Thunderbird vas bo zdaj pozval, da nastavite dodatne nastavitve za dostop do iClouda.
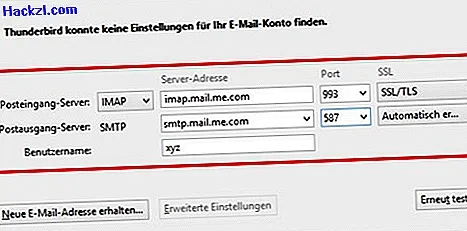
- Za strežnik dohodne pošte vnesite "imep.mail.me.com" kot ime strežnika in izberite vrata "933".
- Za odhodni strežnik vnesite "smtp.mail.me.com" kot ime strežnika in izberite vrata "587".
- Imeni del vašega e-poštnega naslova iCloud mora biti shranjen kot uporabniško ime. Za primer naslova " " je uporabniško ime "xyz". Kliknite »Poskusi znova«.
- Po kratkem preizkusu funkcij zaključite nastavitev računa z »Končano« in kliknite »V redu«.
Zadnji korak v sinhronizaciji
Če želite zagotoviti, da so vse mape v vašem e-poštnem naslovu iCloud sinhronizirane v Thunderbird-u, morate narediti še zadnji korak:
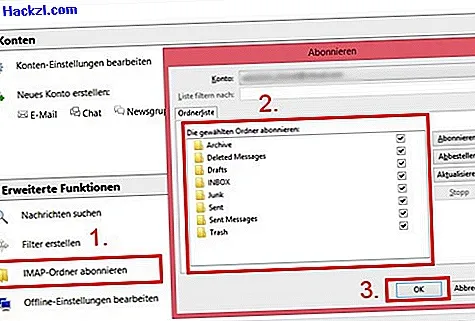
- V glavnem oknu Thunderbird kliknite vaš nov dodani račun iCloud v levem stolpcu.
- Pod "Napredne funkcije" kliknite "Naročite se na mapo IMAP". Izberite vse mape, ki jih želite sinhronizirati s Thunderbird-om in potrdite s »V redu«.
Ta članek velja za Thunderbird 24.5.0. V drugih različicah se postopek lahko nekoliko razlikuje. Če pa ne želite sinhronizirati svojega iCloud naslova z Thunderbird-om, ga lahko povežete z Outlookom.